“I think I’m a software developer because I’m developing software.”
— Arjen van Bochoven, creator of MunkiReport-php
In the last 5-10 years, the career arcs of many Mac admins bent ever closer to our cousins the software engineers. We’re writing more code in more languages, maintaining open-source tools, and even venturing into advanced engineering practices like automated software builds, unit testing, and dependency management.
Such blending of software development principles with operational tasks has been saddled with a trendy buzzword: “dev ops.” No matter what you call it, sharing and spreading good development practices into operational teams like IT and security makes increasing sense nowadays. If your team is using code to manage devices or govern security posture, some of our cousins’ development tools and practices might be very useful to you.
Pre-commit
One specific tool I’d like to familiarize more Mac admins with is pre-commit, a multi-language framework for managing Git hooks. Pre-commit checks your Git repo automatically before each commit to make sure specific tests pass. Depending on the test, a failure can stop your Git commit from happening, thus permitting you a chance to fix the error.
This way, you can be confident that any code you write, whether it’s Python, shell, plist, yaml, or other file types, always passes a consistent set of tests. Pre-commit has saved me from many bone-headed mistakes that otherwise would have been preserved in the Git log forever.
A note about the name
It’s worth disambiguating the “pre-commit” name here. There are many types of Git hooks, including pre-commit, post-commit, pre-push, and others. The pre-commit hook seems to be the one most often used by developers, which is probably why the pre-commit framework is named as it is. The pre-commit framework can manage the other Git hooks as well, if you require them.
There is a large library of pre-written hooks available, and you can also create your own if you have special conditions you’d like to test for. A few of the pre-commit hooks I repeatedly rely on include:
check-merge-conflict: Prevent committing if a merge conflict is unresolvedcheck-yaml: Ensure YAML files are validdetect-private-key: Prevent committing private keysno-commit-to-branch: Prevent committing to a specific branchtrailing-whitespace: Remove trailing whitespacefix-encoding-pragma: Add encoding line to Python files
Setup
Let’s walk through how to configure the no-commit-to-branch hook in your own Git repo.
The no-commit-to-branch hook proves valuable if your team’s Git host settings prevent pushing to the remote default branch (usually called main or master). Organizations that require pull request approvals, for example, would likely be configured this way. The no-commit-to-branch hook protects your local default branch in a similar manner, which greatly reduces the likelihood of having to back out of accidental local commits.
-
First, install pre-commit. I choose to do this with Homebrew:
brew install pre-commit -
Next, create a .pre-commit-config.yaml file (note the leading dot) at the root of your Git repo with the following contents:
repos:
  - repo: https://github.com/pre-commit/pre-commit-hooks
    rev: v5.0.0
    hooks:
      - id: no-commit-to-branch
Note that as of this post,
mainandmasterare the default branches that the hook checks for. If your default branch is named differently, you can specify a--branchargument with the desired branch name(s), like so:repos: - repo: https://github.com/pre-commit/pre-commit-hooks rev: v5.0.0 hooks: - id: no-commit-to-branch args: ["--branch", "production", "--"] -
Finally, navigate to your Git repo and activate the hooks:
cd ~/Developer/your_git_repo pre-commit install
That’s it! From now on, the no-commit-to-branch hook will run prior to every git commit you do. If you’re not on a protected branch, your commit will succeed:
% git branch --show-current
test
% git commit -m "This commit should succeed"
Don't commit to branch...................................................Passed
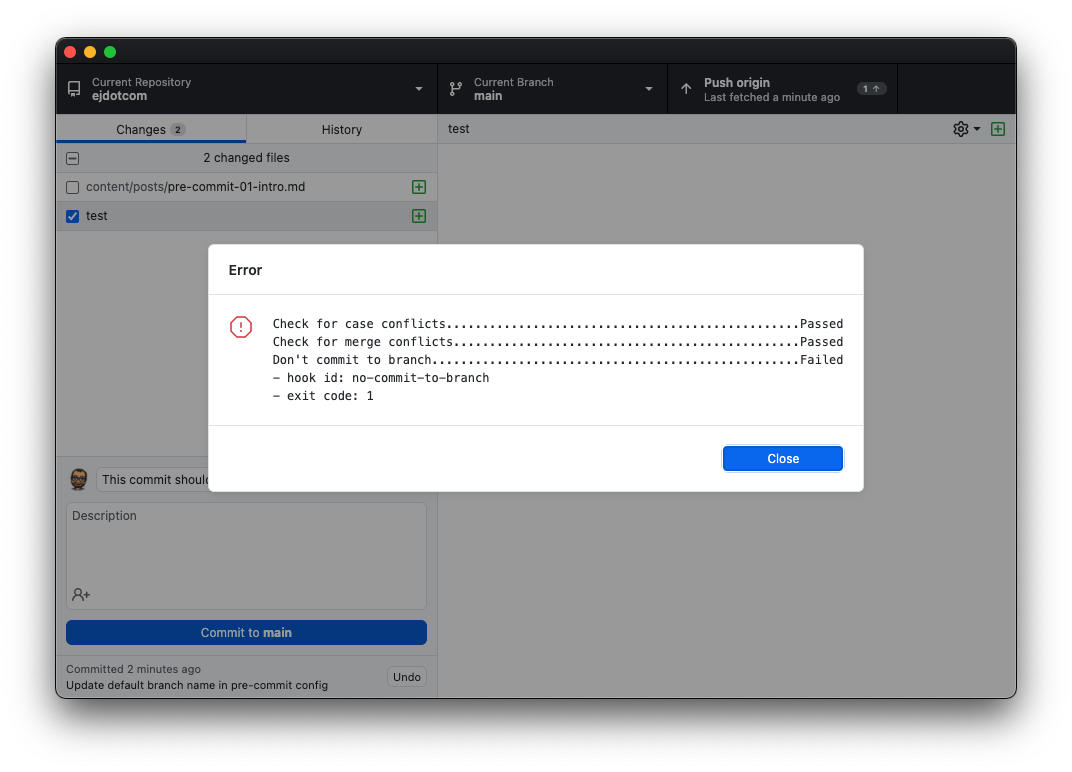
If you are on a protected branch, the hook will fail and the commit will halt, giving you an opportunity to switch branches and try again.
% git branch --show-current
main
% git commit -m "This commit should fail"
Don't commit to branch...................................................Failed
- hook id: no-commit-to-branch
- exit code: 1
The hooks will also affect commits issued by GUI apps like GitHub Desktop or Fork:
Adding hooks
To add more hooks to your repo, edit the .pre-commit-config.yaml file with the necessary repos and hooks. Refer to the pre-commit Supported Hooks page to see what hooks you might be interested in using.
Additional hooks from the same repository can be added to the existing hooks list, as shown with the check-merge-conflict hook below:
repos:
  - repo: https://github.com/pre-commit/pre-commit-hooks
    rev: v5.0.0
    hooks:
      - id: no-commit-to-branch
        args: ["--branch", "production", "--"]
- id: check-merge-conflict
You can add hooks from a different repository by supplying the repo’s URL and desired tag/revision to use, as shown with the black repo and hook below:
repos:
  - repo: https://github.com/pre-commit/pre-commit-hooks
    rev: v5.0.0
    hooks:
      - id: no-commit-to-branch
        args: ["--branch", "production", "--"]
      - id: check-merge-conflict
- repo: https://github.com/psf/black
rev: 24.10.0
hooks:
- id: black
Each time you modify the .pre-commit-config.yaml file, commit the file to your repository as you would any other changes.
Updating hooks
Pre-commit hook authors occasionally make changes and fix bugs in their hooks, and updating your config to use newer versions of their hooks incorporates those changes into your workflow.
New revisions/tags can be specified manually by changing the rev value in your config. However, it’s much easier to use the following command to automatically update all hooks in your configuration to the latest available version:
pre-commit autoupdate
How often you update the hooks (and whether you update at all) is entirely up to you. Personally, I try to remember to run autoupdate on my Git repos once every few months, or when I encounter issues with the hooks themselves. Here’s an example of the result of running autoupdate on one of my projects.
Testing all files
For file-based checks, the only files checked are the ones modified by your commit. You may find it useful to force pre-commit to check all files in your repo once, separate from any Git commit. This is great for testing that your code still passes all checks after updating the hooks with autoupdate, or after adding new hooks to your config. Use this command:
pre-commit run --all-files
You’ll see output indicating hooks’ status: “Passed,” “Skipped,” or “Failed.”
black....................................................Passed
Check Yaml...............................................Passed
Check JSON...........................(no files to check)Skipped
Don't commit to branch...................................Failed
- hook id: no-commit-to-branch
- exit code: 1
Trim Trailing Whitespace.................................Passed
Skipping hooks
If you ever need to bypass the pre-commit hooks (for example, to issue a one-time commit to a protected local branch), you can use the -n or --no-verify flag when committing.
git commit -nm "This commit should succeed"
Remote rules still apply
Skipping pre-commit hooks locally does not bypass your Git remote host settings. For example, if you have your Git host configured to prohibit pushes to the default branch, or if you have pre-commit configured to run on CI/CD pipelines, bypassing local hooks with --no-verify may not achieve what you want.
Collaboration
In the dev ops spirit, a huge strength of pre-commit (and its raison d’être versus unmanaged Git hooks) is the ease with which these code tests can be adopted by your fellow collaborators. As long as the team member has pre-commit installed (brew install pre-commit) and the repo hooks activated (pre-commit install), their code will pass exactly the same checks as yours.
Team adoption of pre-commit hooks allows ensuring a consistent coding style for your project, can help prevent time-consuming merge conflicts, and can also reduce the likelihood of logical and syntax errors.
Here are a few tips I’ve found useful for collaborating with pre-commit:
-
🎉 Celebrate hook failures. When a pre-commit hook fails and prevents me from committing, I view it as being granted a second chance to catch an oversight, not as an obstacle impeding my progress or limiting my freedom. Spreading this glass-half-full view to fellow collaborators (while trying not to be cheesy about it) helps prevent overwhelm, especially for developers who may not have used such guard rails in the past.
-
📚 Include documentation for pre-commit setup. For new contributors to your project, outlining the pre-commit installation and activation steps in your project’s README or CONTRIBUTING document serves to simplify their onboarding process. (Example here.)
-
🍱 Separate pull requests for config changes. Conventions vary by project and by contributors, but generally changes to the pre-commit configuration should be submitted as a standalone pull request rather than blended into another PR focused on a different goal. This helps remove unrelated changes from feature/bugfix PRs, making them a bit easier to review.
-
💬 Socialize before adopting opinionated hooks. Some hooks — especially those that enforce specific code styles or linting like pylint or flake8 — can cause confusion among contributors to your project if adherence to those coding standards hasn’t already been socialized on your team. Take some time to check in with your team and agree on which standards to adopt instead of surprising them with a stringent new hook requirement.
Further reading/watching
In a future post I’ll have more to say about pre-commit — including some suggestions tailored specifically to Mac admins. Until then, I strongly recommend checking out the documentation and list of supported hooks.
For those that prefer video, here’s a session from MacDevOpsYVR 2019 where I presented much of the information above.

