In previous posts, I’ve introduced you to MunkiPkg and provided some Git collaboration tips for MunkiPkg projects. This time, I’d like to share a workflow for using GitLab’s continuous integration (CI) features to build installers for MunkiPkg projects automatically. If your organization uses MunkiPkg for lightweight packaging and GitLab for source control, this automation can save you a great deal of time.
Requirements
To follow along, you’ll need the following:
-
GitLab: Either the enterprise version or an account on gitlab.com will work.
-
Runner Mac: A Mac that you can dedicate to the role of running GitLab tasks. The Mac should be physically secure — in a server rack or locked room, for example.
Configure GitLab runner Mac
First, you’ll configure your runner Mac with the necessary settings and software to run GitLab CI jobs.
-
Log in as a local administrator on your designated runner Mac.
-
Configure the Mac to never sleep. You can do this via System Preferences → Energy Saver, or with this Terminal command:
sudo pmset -a autorestart 1 sleep 0 hibernatemode 0 disablesleep 1You can optionally configure a startup/wake schedule as a redundant way to ensure the Mac remains accessible:
sudo pmset repeat wakeorpoweron MTWRFSU 06:00:00 -
In System Preferences → Sharing, Enable whatever type of remote access your team needs in order to administer this Mac and periodically install updates — for example, screen sharing (ARD/VNC) or remote login (SSH).
-
Create a non-admin user named GitLab Runner, username gitlabrunner. Choose a non-trivial password and store the password somewhere secure for your team.
Why use a non-admin account?
GitLab jobs executed by this runner will have shell access to your runner Mac. This is why you should avoid using the runner Mac for other work and minimize the privileges granted to the user that will be running the jobs. For more information, see the Runner Security page of GitLab’s documentation.
-
Optional: Install Homebrew. This can simplify some of the subsequent installs.
-
Remain logged in as an administrator, and follow the macOS GitLab runner binary installation instructions. (You can use the Homebrew installation instructions if Homebrew is installed on the Mac. Otherwise use the Manual installation instructions.)
-
Install Git (via
brewor download here). -
Install Python 3 (via
brewor download here). -
Install the PyYAML module for Python 3:
pip3 install --upgrade PyYAML(This allows using MunkiPkg with
build-info.yamlmetadata files.) -
Create a local clone of the MunkiPkg project:
git clone https://github.com/munki/munki-pkg /Users/Shared/munki-pkg -
Add
munkipkgto the shell path using a symbolic link:ln -s /Users/Shared/munki-pkg/munkipkg /usr/local/bin/munkipkg -
Optional: Configure automatic login for the gitlabrunner user account in System Preferences → Users & Groups.
-
On the runner Mac, log out as the administrator account, and log in as gitlabrunner.
-
Go to your Settings page on GitLab (either main settings or the settings of a group you’re a member of), and click the CI/CD settings page. Then locate the Runners section and click Expand, and you’ll see an area called Specific Runners. Make a note of the URL and registration token shown there.
-
On the runner Mac, follow the runner registration instructions, providing the following information when prompted:
- URL: (paste the URL displayed on the group CI/CD settings page above)
- Token: (paste the token displayed on the group CI/CD settings page above)
- Description: (press Return to accept the default hostname, or type your own)
- Tags:
munkipkg - Executor:
shell
-
Return to your group CI/CD settings page on GitLab and verify that the new Mac runner appears in the list of group runners.
-
On the runner Mac (logged in as the gitlabrunner account), open Terminal and start the GitLab Runner service:
gitlab-runner install && gitlab-runner start -
Verify that the GitLab runner is working:
gitlab-runner statusThe output should include
gitlab-runner: Service is running. If not, pause here and troubleshoot.Check log permissions
If your runner stops immediately after starting, check that the gitlabrunner user has write access to the
StandardOutPathandStandardErrPathlocations specified in the GitLab runner LaunchAgent. -
Restart the runner Mac. (And log in as gitlabrunner if needed.) Run
gitlab-runner statusagain to verify the runner is working.
Configure build script
The next part of the process creates the CI configuration file and a script that triggers MunkiPkg builds.
Adjust paths if needed
The script and CI configuration below assume that your MunkiPkg project folders are all in the root level of your repository. If you put your MunkiPkg projects in a subfolder, you’ll need to add another layer to the paths in the for loop in the shell script and the artifacts:paths in the yaml config.
-
In the repository where you store MunkiPkg project sources, create a file called
munkipkg_build.shwith the following contents:1 2 3 4 5 6 7#!/bin/sh # This script is referenced by .gitlab-ci.yml and uses # MunkiPkg to build projects in this repository. MUNKIPKG="/usr/local/bin/munkipkg" for proj in */build-info.*; do python3 $MUNKIPKG "$(dirname "$proj")" || exit 1 done -
Also create a file called
.gitlab-ci.ymlwith the following contents:1 2 3 4 5 6 7 8 9 10munkipkg_build: script: - sh munkipkg_build.sh artifacts: paths: - "*/build/*.pkg" tags: - munkipkg only: - main -
Commit and push the
munkipkg_build.shand.gitlab-ci.ymlfiles to GitLab.
Try it out
Now the fun part: any time you push a commit to the main branch of the repository, MunkiPkg will automatically build packages and upload them as artifacts to GitLab.
- On your regular Mac (not your GitLab runner), create a demonstration MunkiPkg project:
munkipkg --create munki_kickstart
touch munki_kickstart/payload/Users/Shared/.com.googlecode.munki.checkandinstallatstartup
-
Commit and push the new project to GitLab.
-
Navigate to your project on GitLab and click the CI/CD section in the left sidebar. Click the Jobs sub-section.
-
There should be a small “download” icon for the most recent job. Click the icon to download the artifacts zip file.

-
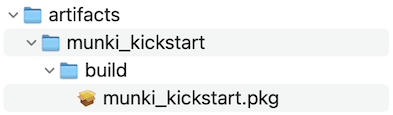
Unzip the artifacts file and you’ll see a package for each of your MunkiPkg projects.
Example repository
I’ve created a working example repository on GitLab that you can use as a reference:
https://gitlab.com/elliotjordan/munkipkg-cicd-build
Next steps
Runner maintenance
Routine care and feeding of your GitLab runner Mac might include performing the following tasks as a local administrator:
- Install macOS and Xcode command line tools updates
- If Homebrew is installed:
brew update - PyYAML upgrades:
pip3 install --upgrade pip PyYAML - Git syncs:
cd /Users/Shared/munki-pkg; git fetch; git pull - GitLab runner updates
Now that you’ve got automation building your packages, you may want to consider creating additional automation that downloads your packages and imports them into your software distribution tool (Munki or Jamf, for example). One way to do this would be to create an override for my GitLabArtifact family of AutoPkg recipes. I’ll go into more detail on this in a future post.

